DF0.dk

This page is a tribute to PT-1210. It is not an official part of the software or production. It is made to help anyone who wants to play Tracker files regardless of skill level. I have mainly focused on the following:

  • Learn how to get startet and what does what on the screen.
  • Support-tool to help you with the functions while playing. Also as a mobile-friendly version nest to your Amiga.
  • Key overlay. I am working on an overlay for the MK1 but can not promise it will ever ber completed. Some of the ideas are work in progress but might still be displayed on this page. 

Main focus is sharing how we can DJ on original Amiga hardware with this wonderful piece of software.

Download
(Original)

Index

PT-1210 MK1 v1.0 / The ProTracker Turntable

I have sectioned the Readme.txt files as seen below. 

Parts have been edited/added my own notes.

The original Readme.txt file for PT-1210MK1 can also be found in its unedited/original version here on this page. 

Please load the file to see the original text.

Original Concept – Hoffman & Akira
Code – Hoffman
Graphics – Akira
System Kill Code – Stingray
Testing – Akira & Tecon

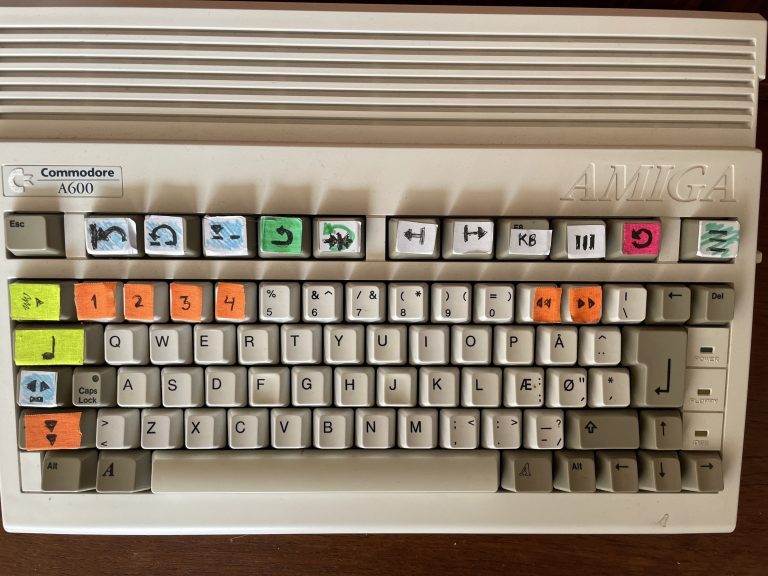
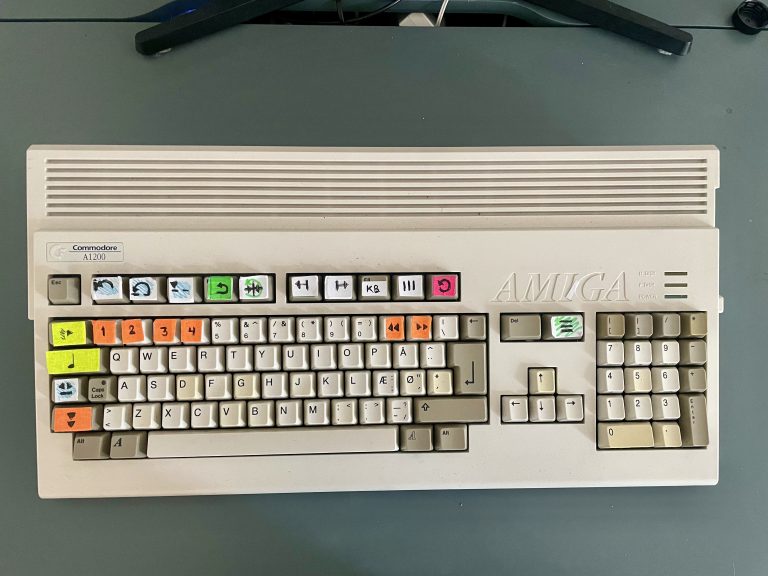
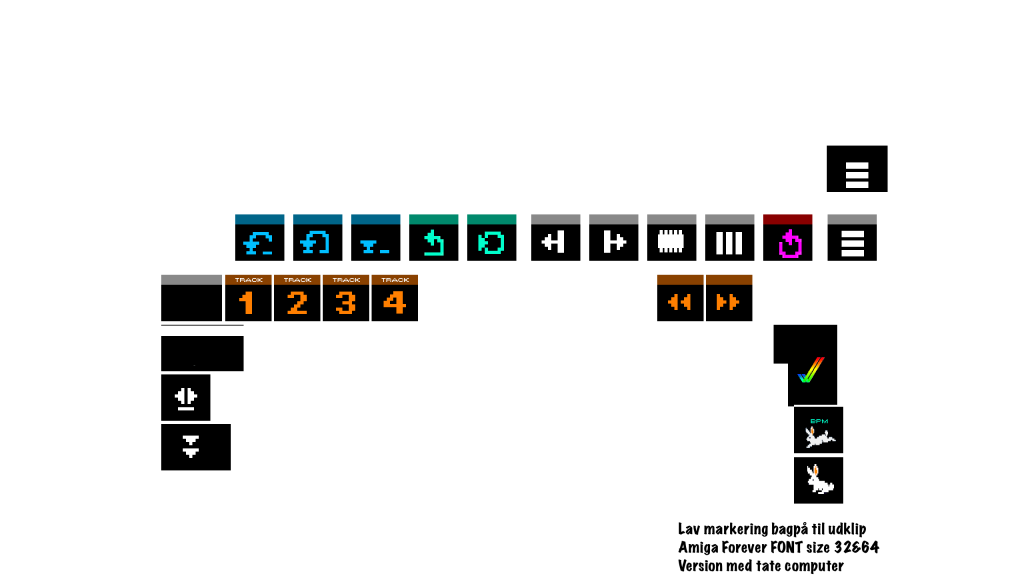
A Readme.txt is included in the software package. Below is a slightly edited version of the README-txt file with added info about icons and keyboard overlay.

The symbols/icons for the overlay is not an official product by the creators but added by “MIO MOI”. 

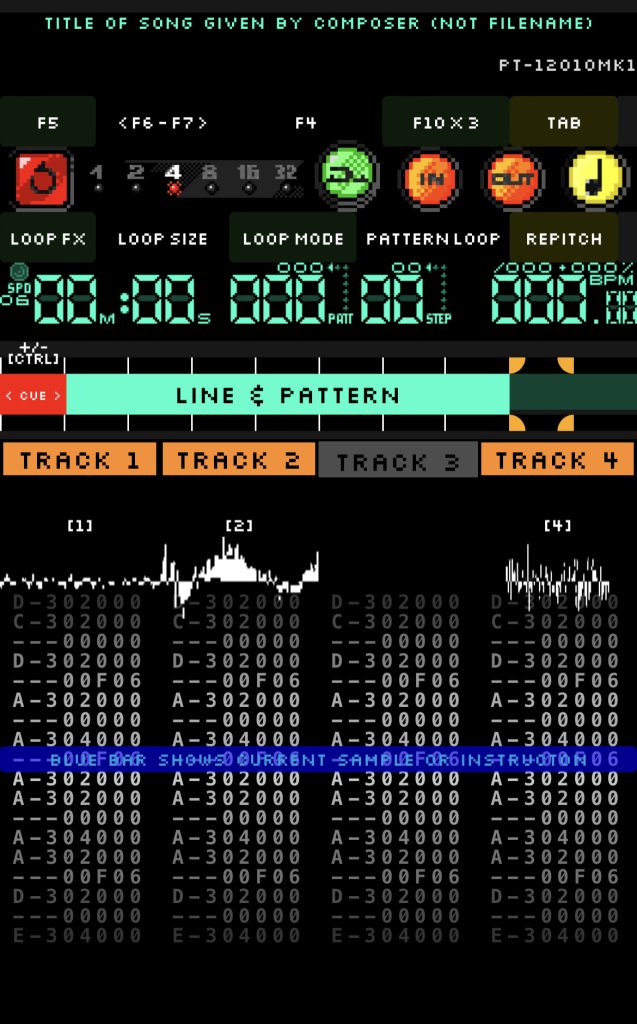
PT-1210 is a program for DJ’ing ProTracker modules. It essentially turns
your Amiga into a turntable / CDJ with nudge, pitch control and so on.

It has a number of features but the most important one is that it can
re-pitch the samples played to match the BPM you want to play the tune at.
This means drum and music loops will still be in sync and the other
instruments will still be in key.

It will run on pretty much any 68k Amiga, OSC/ESC, AGA, accelerated and so on.
I would recommend however that you run it using a CF card on the IDE port
with 2 meg of chip RAM. If you are using two Amigas I would also recommend
that they are the same type, like two A1200s or two A600s. You can also
use a PCMCIA adapter CF/SD card or even floppy disk.

Put all your modules in a folder with the program and run it. When it starts
it will scan the current folder for any ProTracker modules and add them to the file
selector (M.K.). It will also try to determine the BPM. Simply select a module and
it will load it, take you to the player screen and start playing.

The Team -History – Changeling

** WHY ON EARTH DID YOU MAKE THIS PROGRAM? **

It started as a discussion on the EAB forum where Akira was asking if the
repitch function would be possible. After some more posts I started making
a little proof of concept program with just one module. It worked and much
better than we expected it to as well! Gradually over time I’ve added more
functions, things like looping, pattern display, scopes and so on.

** CAN I HAVE A SYSTEM FRIENDLY VERSION? **

Of course!, if you want to code it yourself! My serious lack of coding skill
on the Amiga means I ONLY know how to bang on the hardware! If you are
seriously interested in producing a system friendly version, get in touch.

** MY MODULE SOUNDS WEIRD **

The player is one of the original ProTracker replay sources so it should be
pretty damn accurate. If it sounds weird, check it in ProTracker v2.3d first
and fix it there. If it still sounds weird, provide us with an example and
we’ll take a look.

Be careful when pitching tunes up higher in BPM. As you probably know the Paula
chip can only play samples up to a certain pitch. If your module runs the
samples high in pitch and you push the tempo up too much, they won’t go any
further.

** I WROTE MY MODULE FT2 AND IT CRASHES PROTRACKER! **

There are a number of modules that exist where they have no REPLEN set on the
samples. Our guess is they’ve been written in FastTracker or similar. These
actually crash ProTracker when trying to play them. Crashing is a bad thing
so we apply a patch to the modules on load to fix this issue.

** USING DIFFERENT AMIGAS **

I’ve tried using an A600 alongside an A1200 and found that by default they do
sound different. This is because they made the A600 badly and chopped a lot of
the high end off the sound. There is a hardware hack for this (ask Akira!)
I also noticed that the timing was slightly different between the two Amigas
which we believe is a small difference in the two systems CIA chips.
The fine pitch adjust should help with this timing issue.

** DO I NEED TO BE AWARE OF ANYTHING WEIRD THAT MIGHT HAPPEN? **

DO NOT UNPLUG A PCMCIA CARD WHILE IT’S RUNNING! IT GOES FUCKING MENTAL!

Also, it seems that SPS formatted drives can sometimes result in module corruption
during loading. We’ve not found a way of recreating this issue yet so are yet to
resolve it. Quick work around is to run it from a PCMCIA card instead.

To give it a quick spin, simply download the .adf file. That is the Amiga version of a diskimage. The program is all setup with reloaded tracks to play and mess around with.

You can use this with a GOTEK USB stick

This part will contain my notes. It is fairly simple but at the same time one of the reasons for the DF0 guide as I was very new to Amiga soft/hardware.

From README:

“Put all your modules in a folder with the program and run it. When it starts it will scan the current folder for any ProTracker modules and add them to the file selector (M.K.)”.

In short: This must be done in the FOLDER which where the program is found on your AMIGA.

Explained: If you place a bunch of MOD-files in the same folder as your .adf and then boots from GOTEK – nothing new will happen. The Amiga software does not know how to search on your USB stick once the program is loaded in. 

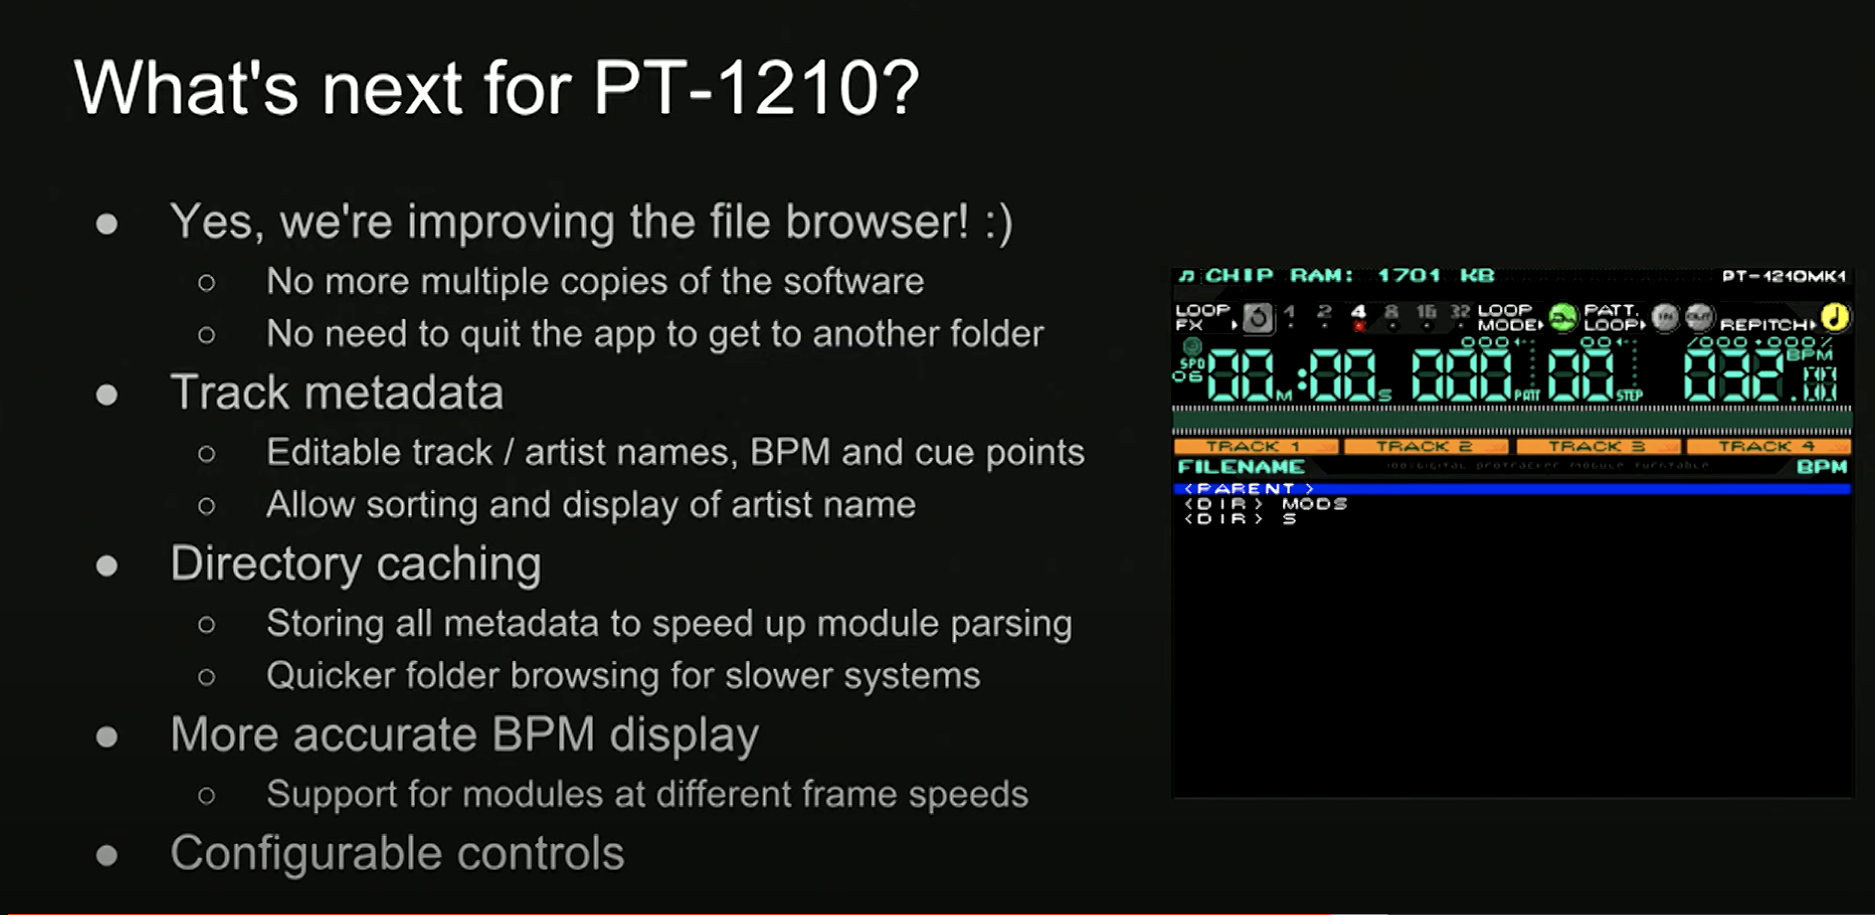
PT-1210MK1 does not know how to display other folders than the one found when loading the program. MK! does not have a “browser” so to speak – it has one folder it uses and that folder is where the program is placed when you boot it on your Amiga.

You can use an Amiga emulator – open the folder with the program and add your MOD-files. However, this solution did not work too well for me on GOTEK as the  .adf file will soon reach its limit. The Amiga will not accept that your file is larger than a floppy disk. Not to my knowledge anyway.

Same goes for unpacking the .adf and adding MOD-files. The diskimage “.adf” itself will become too big for the Amiga to accept as a floppy disk. 

Specific from If you want to create a Gotek “Floppy” solution by Unpacking the software (.adf file) and adding MOD-files to the unpacked foler on your standard computer then remember: GOTEK will search your USB for a floppy disk image .adf – And repacking all of it will (like before) become too big of a file for the Amiga to accept as a floppy disk. 

HARDDRIVE:

This is the recommended solution. Copy the software into a workbench folder on your Amiga. Add MOD-files to the same folder (using your Amiga) just like the README explains. 

I prefer using doctors Opus (Dopus) and keep a backup of all my MOD-flies there. And with the program, I search for the MOD-files I want to DJ and copy (not move) them into the folder that contains the program. It is keep the list short and fast.

GENERALLY

Use the internet for downloading the software and unlicensed/free to use trackerfiles to your computer. Transfer it all to your Amiga and organise it there.

From the Youtube video “Revision 2019 – Seminar – PT-1210 Workshop”.


** MY MODULE SOUNDS WEIRD **

The player is one of the original ProTracker replay sources so it should be
pretty damn accurate. If it sounds weird, check it in ProTracker v2.3d first
and fix it there. If it still sounds weird, provide us with an example and
we’ll take a look.

Be careful when pitching tunes up higher in BPM. As you probably know the Paula
chip can only play samples up to a certain pitch. If your module runs the
samples high in pitch and you push the tempo up too much, they won’t go any
further.


** I WROTE MY MODULE FT2 AND IT CRASHES PROTRACKER! **

There are a number of modules that exist where they have no REPLEN set on the
samples. Our guess is they’ve been written in FastTracker or similar. These
actually crash ProTracker when trying to play them. Crashing is a bad thing
so we apply a patch to the modules on load to fix this issue.

** USING DIFFERENT AMIGAS **

I’ve tried using an A600 alongside an A1200 and found that by default they do
sound different. This is because they made the A600 badly and chopped a lot of
the high end off the sound. There is a hardware hack for this (ask Akira!)
I also noticed that the timing was slightly different between the two Amigas
which we believe is a small difference in the two systems CIA chips.
The fine pitch adjust should help with this timing issue.

** DO I NEED TO BE AWARE OF ANYTHING WEIRD THAT MIGHT HAPPEN? **

DO NOT UNPLUG A PCMCIA CARD WHILE IT’S RUNNING! IT GOES FUCKING MENTAL!

Also, it seems that SPS formatted drives can sometimes result in module corruption
during loading. We’ve not found a way of recreating this issue yet so are yet to
resolve it. Quick work around is to run it from a PCMCIA card instead.

I have experience “OUT OF MEMORY” quite radonmly. The Amiga has the requirements (RAM and such) . 

  • If it happens during a live set either use the “F8” function and only use smaller sized Modules or do a reboot.
  • FIX: If you boot from harddisk through Workbench – make then having a picture as background on the desktop sucks up a lot of memory. It might actually help to not have a picture. 
  •  

Program will not load:

  • You must have at least one MOD-file in the folder for the program to start. 

LOOP FX SIZE

  • If size reaches beyond current pattern and on to the next – it will stop looping while indicator is still being lit.

My notes:

My setup was fairly simple. An Amiga 1200, Workbench and some great MOD files. The FLASH HD install was made by my greatest Amiga supporter, Troels aka Amiga Troels. I normally have a setlist as a backup while adjusting according to the energy of the audience. When performing as MIO MOI I like to add something independently strictly for artistic reasons. Make-up, shirt with stickers coming off etc. But, that is where my part ends and then it is up to the Amiga to win people over. It has never failed. The tracker files grabs us. Even with low rate samples the message is direct.

My good friend Les Railton arranges Chip Wood in Denmark.  He was kind to put me on the poster and a few weeks prior to this I gave it a try and installed Gotek on an Amiga. I decided to see if others could recommend a tracker player or some software for DJing . I honestly live in a square bubble sometimes. To my surprise, PT-1210 was created! 

With about 14 days to show I decided to give it a go. Found the DJ Flash HD and booted it up on an Amiga 1200 I bought for the event. It worked! Had to learn how to transfer & install PT-1210 on the harddrive from scratch. I knew how to make a demo run from Gotek but I will agree with the README file when it says an harddisc install is best. Honestly had some troubles transferring files as I didn’t know much about .adf (and the limitations of file size). I am also currently a Mac user these days so that too was an experience. Anyway, Amiga has the greatest community and with bulletins boards and YouTube day and night I found my way. With soldering on the go and weird programs on my Mac it seems like I was closing in but so was the deadline. I ended up buying two more Amiga 600’s as the one was a gamble and surely was not working. Soldering Amiga 600 requires skills at a higher level – those to master this, I salute you.

Hardware kept freezing too. Family might question why I find this funny as computer parts, CRT screens filled up our home. But when it works, it transcendent time.  I had my first real try-run with setup two days before show. I decided right there to make stickers for both Amigas. Icons tend to work for me in any situation. The stickers and icons were done by hand but I have decided to make them in GIMP and make them pixel-perfect.

My setup ended being two CRTs a KAOSS mixer and an Amiga 1200 and an Amiga 600. I did experience that they didn’t keep the same BPM but that wasn’t really a big concern. The user interface and quick load time, no use of a mouse and so much more simply made it wonderful. It was intuitive and even though one of the Amigas froze while performing LIVE it was still trusty experience. I rebooted while keeping the other one entertaining. 

Why did I tell you all this?

Well, mostly to say. Give it a go. If I can do it so can you. And it is also to show that PT-1210 can be a tool and DJ software for anyone.

You are very welcome to use the icons I made. I might improve on them as time goes. But I guess I’ll call them Version 1 and so on if that is the case.

DF0.dk is also used as a software tool where I will split the README file up and add some of my own. A tutorial might be helpful when it is possible to click here and there and see what the different functions are. 

Hopefully my mistakes and confusion can create a guide to make it a walk in the park.  

It should work as a guide on your phone next to your setup if my mission is successful.

PLANNED VERSIONS:

AMIGA 600 VERTICAL

AMIGA 600 DIAGONAL

AMIGA 1200 VERTICAL

AMIGA 1200 DIAGONAL

NOTES:

I have edited the BPM FAST RAM Rabbit a bit. 

I have been DJ’ing on Amiga since late 10s. 

My first performance  with PT-1210 was a great experience.

Labels are made a bit larger than needed to give room for scissor cuts.

File Selecta Mode

Load Archive
HELP = Switch screens (load and DJ mode)
Switch screens Load /DJ mode: Press HELP

Select file: Press UP / DOWN
Load tune:   Press RETURN

Pick first file with matching first letter: Press A-Z / 0-9

Show module size (in KB):                  F8
Sort list by filename (toggles asc / desc) F9
Sort list by BPM (toggles asc / desc)      F10

Quit: Hold ESCAPE for a second

NOTE: Quit will not work if a tune is playing!
HELP        = Switch screens (load and DJ mode)

UP / DOWN   = Select file
RETURN      = Load tune

F8          = Show module size (in KB)
F9          = Sort list by filename (toggles asc / desc)
F10         = Sort list by BPM (toggles asc / desc)

ESCAPE      = Quit (hold for a second)
A-Z / 0-9   = Pick first file with matching first letter

NOTE: Quit will not work if a tune is playing!
F10 = Sort list by BPM (toggles asc / desc)

From Readme.txt
The BPM detection works by looking at the first line of the first pattern within the module. This seems to work pretty well as it's always the first thing you set. However, if no BPM is set on the first line, then it will assume that it is VBR timing rather than CIA and set the BPM to 125. This is fine as long as the tune has been written at, say for example a tempo of 6 or 3 as this is 125 BPM. If the module is written with no CIA timing and a tempo of say 5, then the BPM will be inacurate.

DJ MODE

HELP = Switch screens (load and DJ mode)
SPACE = Stop / Play
` = Kills sound DMA

CLICK TO EXPAND BELOW

UP           = Increase BPM
UP & SHIFT   = Increase BPM fine tune
DOWN         = Decrease BPM
DOWN & SHIFT = Decrease BPM fine tune

LEFT          = Nudge backward 
LEFT & SHIFT  = Hard nudge forward 
RIGHT         = Nudge forward 
RIGHT & SHIFT = Hard nudge back

From Readme.txt
The BPM detection works by looking at the first line of the first pattern within the module. This seems to work pretty well as it's always the first thing you set. However, if no BPM is set on the first line, then it will assume that it is VBR timing rather than CIA and set the BPM to 125.

This is fine as long as the tune has been written at, say for example a tempo of 6 or 3 as this is 125 BPM. If the module is written with no CIA timing and a tempo of say 5, then the BPM will be inacurate.
If a TRACK is PLAYING SOUND you will see a soundwave

Every TRACK has a COLUMN WITH CODES. These are all commands the composer of the MOD file has given the track. Often the CODE will trigger a SOUND SAMPLE but it is also used when the composer wants to adjust BPM pitch and more.

You can MUTE a TRACK with the 1/2/3/4 KEYS on your AMIGA

In the SCREEN EXAMPLE KEY 3 is pressed and TRACK 3 is therefore MUTED & GREY.

Jump to cue pattern : F1  
Jump to cue pattern after current pattern ends: F2
– Will also work when PATTERN LOOPING is set a different place on the line (super useful)

Set current pattern as cue: F3

Move FORWARD one whole pattern: +
Move forward small LINE LOOP position: + SHIFT 
Move forward CUE pattern:CTRL

Move BACK one whole pattern:
Move back small LINE LOOP position: SHIFT
Move back CUE pattern:CTRL  

PATTERN LOOP modes F10
– LOOP START POINT: First press
– LOOP END POINT: Second press
– DEACTIVETATE LOOP: Third press

Note:
Line looping ONLY moves WITHIN chosen PATTERN LOOPING if that is made ACTIVE beforehand by pressing F10

              Pattern / Position Functions
F1          = Jump to cue pattern
F2          = Jump to cue pattern after current pattern ends
F3          = Set current pattern as cue
+ = Move forward one pattern - = Move back one pattern SHIFT + = Move forward line loop position SHIFT - = Move back line loop position CTRL + = Move cue pattern forward CTRL - = Move cue pattern backwards
F10 = Pattern Loop (start / stop / deactivate) F10 will cycle through the pattern loop modes. - First press will store the loop start point - Second press will store the loop end point. - Third press will then deactivate the loop.
F5           = Activate LINE LOOP

F6          = Decrease loop size
F7          = Increase loop size

F4          = Toggle Slip On / Off

LINE LOOPING enables you to loop small sections of the current pattern. The loop start point currently quantises to a beat (assuming speed 6) so positions 0,4,8,12,16,20,24,28... etc.

Also see "Pattern / Position Function" for "PATTERN LOOPING".

If size reaches beyond current pattern and on to the next - it will stop looping while indicator is still being lit.
F5 for LOOP FX ON/OFF
TAB = Toggle repitch on / off

When ON music will pitch brighter with faster BPM

F4 = Toggle Slip On / Off

Slip mode is enabled by default. If you activate a loop with this ON, it continues to increase the track position while looping. This means when you deactivate the loop, the track drops into the position of the tune as if you never looped it. You can switch to normal loop mode which will continue playing the track from after the loop point when deactivated.
Pattern loop modes F10 
- LOOP START POINT: First press
- LOOP END POINT: Second press
- DEACTIVETATE LOOP: Third press


F10 will cycle through the pattern loop modes. The first press will store the loop start point and the second press will store the loop end point. The third press will then deactivate the loop

Example with TRACK

KEY 3 is pressed and TRACK 3 is therefore MUTED & GREY. TRACK 2 is playing louder than TRACK 1 which can be due to the SAMPLE that it is currently playing. The BLUE BAR shows which samples are currently available in all 4 TRACKs. The “CODE” presented shares which instruction or execute.

Click the button or area you want to know more about below.

You will then be directed to the info box which you can press to expand for more info.

Keys for the specific functions are also mentioned on the screen here.

PT-12010MK1

Title of SONG given by Composer (not filename)

PT-12010MK1

+/- [CTRL]

[F2] + [F1]

[F2] + [F1]

[F10]

Soundwave will show when sample and sound is playing in the track.
Determined by the “CODE”
displayed such as

D-302000


D-302000
c-302000
---00000
D-302000
---00F06
A-302000
---00000
A-304000
---00F06
A-302000
A-302000
---00000
A-304000
A-302000
---00F06
D-302000
---00000
E-304000


D-302000
c-302000
---00000
D-302000
---00F06
A-302000
---00000
A-304000
---00F06
A-302000
A-302000
---00000
A-304000
A-302000
---00F06
D-302000
---00000
E-304000


D-302000
c-302000
---00000
D-302000
---00F06
A-302000
---00000
A-304000
---00F06
A-302000
A-302000
---00000
A-304000
A-302000
---00F06
D-302000
---00000
E-304000


D-302000
c-302000
---00000
D-302000
---00F06
A-302000
---00000
A-304000
---00F06
A-302000
A-302000
---00000
A-304000
A-302000
---00F06
D-302000
---00000
E-304000

EQ & Volume

Soundwave will show when sample and sound is playing in the track. Determined by the “CODE” displayed such as:

D-302000

---00F06
D-302000
c-302000
---00000
D-304000
D-302000
---00F06
A-302000
A-302000
---00000
A-304000
A-302000
---00F06
A-302000
A-302000
---00000
A-304000
A-302000
---00F06
D-302000
C-302000
---00000
E-304000
D-302000
---00F06
D-302000
D-302000
---00000
D-304000
D-302000
---00F06
D-302000
D-302000
---00000
D-304000
D-302000
---00F06
D-302000
D-302000
---00000
D-304000
D-302000
---00F06
D-302000
C-302000
---00000
E-304000
D-302000
---00F06
D-302000
c-302000
---00000
E-304000
D-302000
---00F06
D-302000
c-302000
---00000
E-304000
D-302000
---00F06
D-302000
C-302000
---00000
E-304000
D-302000
---00F06
D-302000
C-302000
---00000
E-304000
D-302000
---00F06
D-302000
c-302000
---00000
E-304000
D-302000
---00F06
D-302000
c-302000
---00000
E-304000
D-302000
---00F06
D-302000
C-302000
---00000
E-304000
D-302000
---00F06
D-302000
C-302000
---00000
E-304000
D-302000

BLUE BAR SHOWS CURRENT SAMPLE OR INSTRUCTON

TRACKS

TRACK is also “Channel” is the README. To keep it simple; “Tracks” is used in this guide.
Link: Learn more about Patterns.

There are 4 TRACKS
KEYS 1/2/3/4 = Mute / Un-Mute TRACK accordingly.

Within each TRACK there is a PATTERN (string of codes) playing SAMPLES (expressed as codes which determine parameters such as speed loudness and more).

Overlay

Test version

WORK IN PROGRESS

Colors used

I have copy/pasted the main colours used om Software. There might be more.

My notes:

My setup was fairly simple. An Amiga 1200, Workbench and some great MOD files. The FLASH HD install was made by my greatest Amiga supporter, Troels aka Amiga Troels. I normally have a setlist as a backup while adjusting according to the energy of the audience. When performing as MIO MOI I like to add something independently strictly for artistic reasons. Make-up, shirt with stickers coming off etc. But, that is where my part ends and then it is up to the Amiga to win people over. It has never failed. The tracker files grabs us. Even with low rate samples the message is direct.

My good friend Les Railton arranges Chip Wood in Denmark.  He was kind to put me on the poster and a few weeks prior to this I gave it a try and installed Gotek on an Amiga. I decided to see if others could recommend a tracker player or some software for DJing . I honestly live in a square bubble sometimes. To my surprise, PT-1210 was created! 

With about 14 days to show I decided to give it a go. Found the DJ Flash HD and booted it up on an Amiga 1200 I bought for the event. It worked! Had to learn how to transfer & install PT-1210 on the harddrive from scratch. I knew how to make a demo run from Gotek but I will agree with the README file when it says an harddisc install is best. Honestly had some troubles transferring files as I didn’t know much about .adf (and the limitations of file size). I am also currently a Mac user these days so that too was an experience. Anyway, Amiga has the greatest community and with bulletins boards and YouTube day and night I found my way. With soldering on the go and weird programs on my Mac it seems like I was closing in but so was the deadline. I ended up buying two more Amiga 600’s as the one was a gamble and surely was not working. Soldering Amiga 600 requires skills at a higher level – those to master this, I salute you.

Hardware kept freezing too. Family might question why I find this funny as computer parts, CRT screens filled up our home. But when it works, it transcendent time.  I had my first real try-run with setup two days before show. I decided right there to make stickers for both Amigas. Icons tend to work for me in any situation. The stickers and icons were done by hand but I have decided to make them in GIMP and make them pixel-perfect.

My setup ended being two CRTs a KAOSS mixer and an Amiga 1200 and an Amiga 600. I did experience that they didn’t keep the same BPM but that wasn’t really a big concern. The user interface and quick load time, no use of a mouse and so much more simply made it wonderful. It was intuitive and even though one of the Amigas froze while performing LIVE it was still trusty experience. I rebooted while keeping the other one entertaining. 

Why did I tell you all this?

Well, mostly to say. Give it a go. If I can do it so can you. And it is also to show that PT-1210 can be a tool and DJ software for anyone.

You are very welcome to use the icons I made. I might improve on them as time goes. But I guess I’ll call them Version 1 and so on if that is the case.

DF0.dk is also used as a software tool where I will split the README file up and add some of my own. A tutorial might be helpful when it is possible to click here and there and see what the different functions are. 

Hopefully my mistakes and confusion can create a guide to make it a walk in the park.  

It should work as a guide on your phone next to your setup if my mission is successful.

PLANNED VERSIONS:

AMIGA 600 VERTICAL

AMIGA 600 DIAGONAL

AMIGA 1200 VERTICAL

AMIGA 1200 DIAGONAL

NOTES:

I have edited the BPM FAST RAM Rabbit a bit. 

I have been DJ’ing on Amiga since late 10s. 

My first performance  with PT-1210 was a great experience.

Labels are made a bit larger than needed to give room for scissor cuts.

#ffffff

#bbbbbb

#aaaaaa

#888888

#666666

#555555

#444444

#333333

#222222

#000000

#77ff77

#00bb00

#00ffcc

#008866

#004433

#ffff66

#ffff00

#ddcc00

#ff8811

#ee6600

#dd4400

#ff0000

#cc0000

#ffaadd

#ff2299

#cc0077

#aa0055

#770033

#0000ff

#001155